
Prior to the propane fridge, we had a 12 volt Mobicool thermoelectric cooler. On hardware store shelf, it looked ideal for my humble 12 volt solar system and didn't seem to draw a lot of amps. It cost around $100 dollars and was easy to move. But, the downside, it had to run all the time, 24 hours a day! In about a day, it would drain the four 6 volt golf car batteries down to dangerous levels. I'd have to run the generator to charge the batteries back up. It was a waste of fuel and time. We ended up disconnecting it and use it as cooler with blocks of ice.
The next plan was a small refrigerator that would be used in a dorm room or under a bar, It ran only on AC current, but, we estimated it needed about 175 watts to run on the lowest setting. It worked without problems in the summer months and it was exciting to see it running full-time off my solar panels system. But, as the sun got lower in the sky, I noticed it started to draw more current and drain the batteries. Luckily the AC inverter had a low power setting and shut off the power before the batteries were damaged.
 |
| Wall modified for RV fridge |
The only problem with the smaller style of RV refrigerators is that it needs to be inserted into a cabinet. The plan was to install it into a nifty wall/pantry unit, but, there just wasn't enough time to build it. I suggested that we go to IKEA and check out the "As Is" section for any cabinets or wall units that were big enough. Ended up finding a pantry unit with a couple of dents, but the price was right and was perfect for the space.

RV refrigerator can sit in a cabinet, but the chamber behind the cooling
 |
| Chamber covered with flashing |
The plan was to make a box in a box approach. That way, if I did need to service the RV refrigerator, it could simple slide out of the chamber. The installation manual had all the measurements and I made a simple box out of plywood,
After assembling the IKEA pantry unit, I measured for the height of the plywood box and adjusted the shelf it was to sit on. Added a few more boards to the shelf for extra strength.
After the RV fridge was hoisted up and on to the pantry shelf, I went around the back and did some more measurements for a ventilation chamber for the wall.
Since the cabin wall behind the fridge was not insulated yet, it was easy to trim the boards and build a frame. It looked like a window frame, accept there was no hole for a window. Once the lower, upper vents, hole for propane hose and exhaust for the flue were cut, the unit would slide back and screwed into place.

For the exhaust flue, a 4" dryer vent was fastened to the flue with pipe clamps. A larger 6" hole was cut and flashed with furnace duct metal. To keep out drafts around the 4" vent, a special high temp caulking used for wood stoves was pumped into the cavities. Spray foam was used in other spaces where there was no contact with heat.
 |
| 4" Dryer vent through wall |
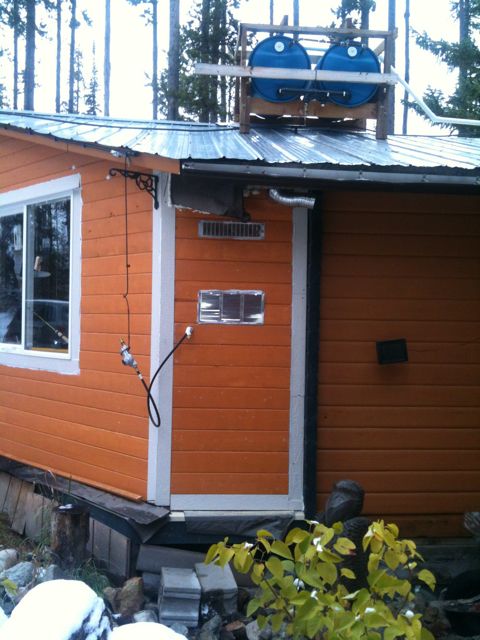 |
| View from the exterior |
 |
| The IKEA pantry is pushed to the wall |
Since the propane RV refrigerator project was completed, it been wonderful. We use it all year and it is really efficient on propane gas. A standard BBQ tank will last 2 months. My spouse is happy and in turn, everyone is happy.


